Ways To Put A Grass Wall Together In El Cajon
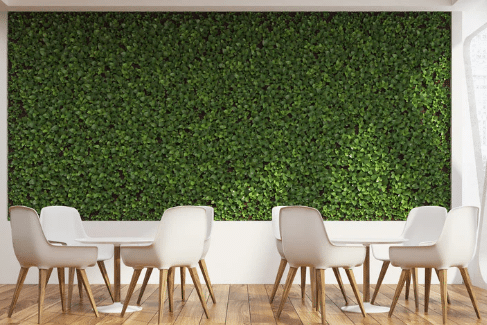 Artificial grass walls, also known as living walls, are becoming increasingly popular. They add a visually appealing element to any space and can help reduce energy consumption by naturally regulating the temperature of the room. But how do you put together your own artificial grass wall? Here are seven steps to get you started:
- Start with the right supplies. You’ll need a frame (think plywood or plastic paneling), some sort of backing material like mesh or lattice, nails and screws, clips for attaching plants to the backing board, adhesive strips if necessary, turf glue (or similar product), artificial grass rolls of desired color/texture/length, scissors or utility knife for trimming turf lengthwise, a measuring tape and leveler.
- Measure and mark the size of the frame you need. Use a leveler to make sure all measurements are accurate, then cut your plywood or plastic paneling accordingly.
- Attach the backing material using nails and screws. Make sure that it is firmly fastened in place and that any seams are properly sealed.
- Apply turf glue along the edges of your artificial grass rolls, if necessary, and lay them out on top of the backing material in a staggered pattern for maximum coverage. Cut off excess materials with scissors or a utility knife as needed for an even surface finish.
- Secure clips onto your wall’s backing material—you can use these to attach plants or other decorative elements to the wall.
- Secure your frame onto the wall using nails and screws, making sure that it is firmly in place.
- Finally, water down your artificial grass wall a few times a week so it stays alive and vibrant.
FAQ’s
How Do You Lay Grass Rolls?
It is important to take the proper steps when installing grass rolls. It is not as difficult as it may seem, but it is highly recommended that you thoroughly research and understand the process before beginning your project. The first step in laying grass rolls is choosing a level surface with good drainage. Amending the soil may be necessary if there are areas of poor soil quality. Next, remove any existing debris such as stones, roots, or weeds. It is also important to make sure there are no low spots in the area you are planning to install the grass rolls as they can lead to uneven coverage and drainage issues. After your space is cleared and prepared, it’s time to begin laying the grass rolls. Start at one end of your area and line up the edge of the roll with a straight edge such as a chalk line or string. Make sure to keep the rows even, leaving no gaps in between them. To ensure proper coverage and drainage, use either a gardening rake or hoe to press down on each piece firmly so it is securely in place. Once all the grass rolls are laid out, you will need to make sure they are connected correctly. To do this, overlap the ends of each piece by at least four inches and use either a spiked roller or lawn seaming tape to secure them together. Make sure not to overstretch your grass rolls when connecting them as this can lead to rips and tears.
How Often Should You Water Down A Grass Wall?
It is important to know how often should you water down a grass wall in order to maintain its health and beauty. Grass walls are popular in many homes and businesses, as they provide an attractive way to add privacy and greenery to the environment. However, these living walls require regular maintenance, including watering them down on a regular basis. The frequency at which you should water down your grass wall depends on a number of factors, including the size and location of the wall, as well as the climate in which it is located. Generally speaking, grass walls that are located in areas with higher temperatures should be watered more frequently than those in cooler climates. Additionally, larger walls will need to be watered more often than smaller ones. When installing your grass wall, be sure to use a high-quality potting soil that is designed for living walls. You should also position your wall in an area where it will receive sufficient sunlight and airflow. Once the wall has been installed, you can begin watering it down on a regular basis. Depending on the size and location of the wall, this may mean watering it every day or two days. You should also use a hose with a misting nozzle to ensure that you are evenly distributing water throughout the wall. Finally, be sure to monitor your grass wall for signs of dehydration and over-watering.
How Do You Secure Fake Grass?
It is important to make sure that the fake grass you use in your home is properly secured so that it can last for many years. There are several methods and techniques you can use to ensure that your fake lawn remains in place and secure. The first step to securing your synthetic turf is to assess the area where it will be installed, taking into consideration the size and shape of the area. You will need to use a sharp knife or scissors to cut your turf according to the measurements of the space you want it installed in, as this will ensure that it fits properly and securely. Once you have cut your turf, it is important to use an appropriate glue or adhesive designed for securing synthetic turf to ensure that it stays in place. Depending on the type of surface you are installing your turf onto, you may need to use a specialised product or technique such as using nails, screws or spikes for a concrete base. You may also want to consider investing in some edging materials such as rubber stakes and pins which can be placed the perimeter of your fake lawn to help keep it in place and. This will also help to create a neat and professional looking finish, as well as reduce water runoff.
How To Install Artificial Grass In Your Home?
It is important to determine the right category of artificial grass for your home before you begin installing it. Artificial grass is designed to look like natural lawn and can be divided into two main categories; residential and professional. Residential artificial grass is designed as a long-term solution suitable for use in gardens, yards, terraces and balconies. It is low maintenance, highly durable and easy to install. Professional artificial grass is designed for use in sports fields, stadiums and other large public spaces where performance and durability are essential. Once you have chosen the right category of grass, it’s time to prepare your lawn before installation. Start by removing any existing plants or vegetation on the area you plan to cover. If the ground is uneven, it should be leveled with a layer of topsoil to create an even surface for installation. Once the area has been prepared, you are ready to begin installing your artificial grass. Start by laying out the roll of turf and securing it in place with pegs or nails. Make sure that all lines are straight and even. Next, cut the turf to fit the area and start securing it with adhesive or nails. Once all of the sections have been secured, you can fill any seams between them with sand or rubber granules for a finishing touch. Finally, add a layer of infill to help protect your grass from extreme temperatures, UV rays and heavy foot traffic. Your artificial grass is now ready to use and enjoy!
Conclusion
It is not difficult to put together an artificial grass wall, but it is important to make sure that you have the right supplies and that everything is properly installed. Follow these seven steps and keep in mind some of the frequently asked questions above for a successful DIY project. For more information, contact Artificial Turf El Cajon at (619) 503-3531.